Push Notification for Diablo Clone event with Gatsby PWA, Netlify Function and Fauna DB
Always curious about PWA and Push Notification but I never found an application of them. Finally, it's the Diablo that gives me the opportunity to try them out. In this article, I will demonstrate how to use Windows Service to send out notifications to a Netlify hosted Lambda function and show the push notification on Gatsbyjs based PWA.

English
中文啦
I have always been a fans of Diablo and have been playing the Diablo II Expansion on and off for years. One thing in the Diablo II, Diablo Clone(DC), is definitely the most exciting event in the world of Diablo. I cannot stress enough that how frustrated I was whenever I missed a hunting event.
So.....what could I do for this? huh.....why not make an tiny application for DC notification? How hard could it be? It must be very easy. Let's do it😁
从小就是 Diablo的骨灰级粉丝, 从Diablo 一代一直跟到Diablo 3, 这些年停停玩玩,但每次玩起这个游戏,即使时光荏苒 依旧对他是激情澎拜!Diablo 2 Exp 中最令人激动的东西就是出现 克隆大菠萝~!错过一次 后悔一年~!😫
那么作为程序员的我, 在新冠肺炎时期能做些什么 让我不再错过每一次的克隆大菠萝(DC)狩猎呢? 嗯。。。。那就做个 DC 即时提醒系统吧~!😍 就是一发生 DC事件, 就立刻通知到我的手机上。 这个应该很简单啊~

Let's see the result first 😁
首先 咱们直接看结果🤩
and how we add the PWA website as an app-like onto mobile desktop
怎样添加PWA 到你的手机桌面
In this article, I will demonstrate:
- How to make a Windows Service with C# .Net Core
- How to use Netlify Lambda function (Powered by AWS Lambda. Simplified by Netlify) as a server-less back-end
- Convert a Gatsbyjs website to Progressive Web App(PWA)
- How to integrate Push Notification into the PWA
- Use Fauna Database to store push subscriptions.
Notice: this article is not a step by step tutorial on topics e.g. converting website to PWA. Those topics have been beautifully written in a succinct approach by others. Instead I will provide my thoughts and helpful references for you to glue the parts together and complete this project.
Initially, I was thinking of flashing a LED light when the DC event is happening and playing a music for selling Stone of Jordan and a different music for Diablo walks the earth. Then setting up my old Arduino components exhausted all my interests on it plus I won't be able to get notified when I'm not at home, so I dropped the LED light idea.
Then I turned around and had a look at what I had: a Gatsby + Netlify CMS website. Interestingly, I even found that the Gatsbyjs Netlify CMS template that I'm using supports Netlify CMS Function~!😍 Then this opens a door for me to use the lambda function as a server-less back-end so that I could do more interesting things.
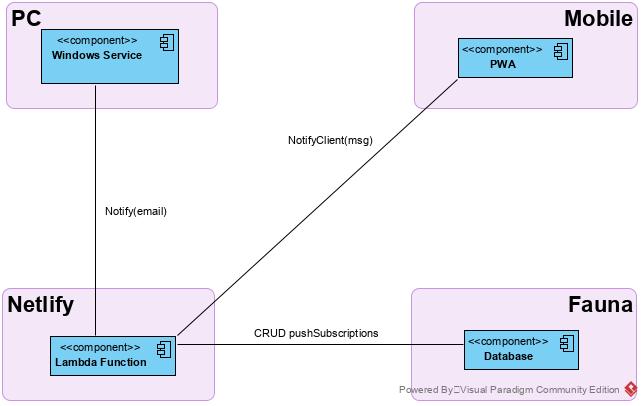
So this is how the project works:
👉when events of selling Stone of Jordan and Diablo walks the earth happen, a file located under a folder let's say: d:\games\diablo2\dc.txt will be updated with the room name, game server ip, my character's name and the date and time will be recorded inside this file.
👉a Windows Service keeps track of the changes of this file and will notify the server-less Netlify Lambda function
👉the Netlify Lambda function then push out notifications to all related subscribers
So how does this all fit together? Okay, let's have a look what the project look like:
Project Architecture
这篇文章会展示:
1. 怎样用C# .Net Core创建一个Windows Service
2. 怎样用Netlify CMS中的Lambda Function(底层是AWS的, Netlify把它给简化了)来作为我们的server-less后端
3. 升級Gatsby.js网站成為PWA(Progressive Web App)
4. 加添Push Notification(消息推送)到我们的PWA网站
5. 利用Fauna Database来存储推送订阅
值得一提的是:这篇文章不会一步一步的教你怎样去做一些基本的东西,例如 升级网站成为PWA。这些内容已经被其他大牛写过了,并且写的也简洁易懂,我就不再班门弄斧了。我则会提供 大牛们写的教程的链接 作为参考资料,并且提供我自己的思路来展示我是怎样把这些内容都串联起来 实现我想要的Diablo 2 克隆大菠萝 即使消息通讯功能。
我最一开始的想法是克隆大菠萝(DC)事件一发生,就让全家的LED小灯一闪一闪亮晶晶,然后播放音乐。并且会根据不同的事件,比如说 有人卖 SOJ 乔丹之石 播放一种音乐, 而DC出现的时候播放另一种音乐。但我的热情都被配置2013年的老Arduino给磨灭光了。。。况且如果我不在家 这套方案也通知不到我啊,所以还是放弃了这个想法。
于是我转念一下,我目前已经有了:Gatsby + Netlify CMS的网站。更好玩的是,它自带 Server-less functions~!😍这其实就是有了后台了 能玩的东西就更多啦.
现在来解释一下整个项目的各个组件是怎样协同工作:
👉当游戏里面出现 出售SOJ或者 克隆大菠萝出现在地表 这样的事件时, 这个文件d:\games\diablo2\dc.txt 就会被自动更新.文件内容包括: 房间名字, 玩家在游戏中的名字, 房价事件:是卖SOJ还是 大菠萝出现,房价的IP地址
👉 我们要做的 Windows Service会在后台一直监控这个文件,如果有任何变化发生 就会立刻通知 运行在Netlify 上面的 Lambda Function
👉 这个Netlify Lambda Function便会把接受到的消息 推送给所有的相关订阅者.
那么他们是怎样结合在一起的呢?
项目构架图
Section 1: Windows Service
For the Windows Service project, its main task is monitoring the dc.txt file and notify the Netlify Function(NF) once the content of this file is changed.
Why makes it a Windows Service?
Because I would like to have a service running in background and continuously keeps tracking of the file and informs the NF once the events happened. In addition, I am lazy, I do not want to manually run this project every time myself, instead once my laptop started, run the service automatically.
Okay, enough talky talk, let's rock and roll:
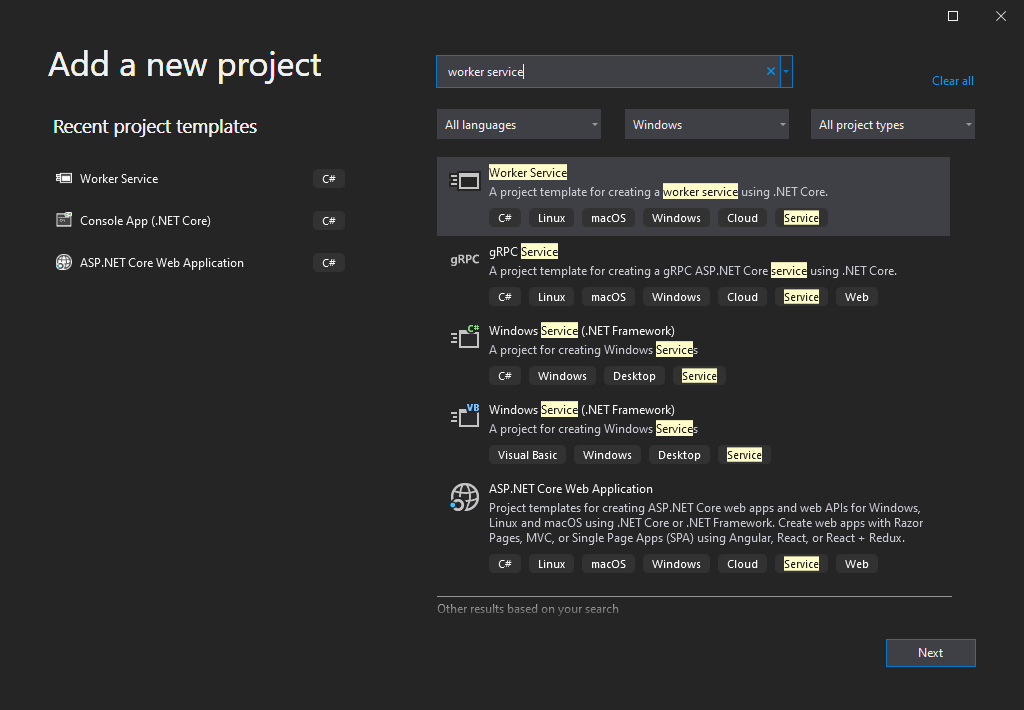
Open Visual Studio 2019 and create a Worker Service project
第一部分: Windows Service(WS)
正如上面提到的那样,对于WS来说 它的主要任务就是监控dc.txt 并且通知Netlify Function(NF)。
为什么要把这部分做成WS?
因为这个项目要做的事情就是应该在后台默默的运行,并且我不想每次启动电脑都要再次手动启动这个程序,所以它要能自动启动。
思路说完了,咱们看看怎么动手。
Install these 2 packages:
Microsoft.Extensions.Hosting.WindowsServices
Microsoft.Extensions.Http
Then open the Program.cs, make it look like this:
首先安装下面2个Neuget packages:
Microsoft.Extensions.Hosting.WindowsServices
Microsoft.Extensions.Http
然后打开 Program.cs 更改成如下:
   public static IHostBuilder CreateHostBuilder(string[] args) =>
            Host.CreateDefaultBuilder(args)
                .ConfigureServices((hostContext, services) =>
                {
                    services.AddConfiguration<DCMonitorConfiguration>(hostContext.Configuration, "DCMonitor");
                    services.AddHttpClient();
                    services.AddHostedService<Worker>();
                })
                .UseWindowsService();
services.AddConfiguration<DCMonitorConfiguration>(hostContext.Configuration, "DCMonitor"); is not necessary if you don't mind a little bit hard-coding stuff in a personal project.
Now open the Worker.cs, change it to something like this:
如果你不介意在个人兴趣项目中使用一些 hard coding的话,那么第5行不是必要的.
打开 Worker.js 改变成如下:
public class Worker : BackgroundService
    {
        private readonly ILogger<Worker> _logger;
        private readonly string TargetFile = @"d:\games\Diablo2\dc.txt";
        private readonly string PushEndpoint = "https://yourwebsite.com/.netlify/functions/";
        private readonly string NotifyEmail = "youremail@gmail.com";
        private readonly HttpClient _httpClient;
        private FileSystemWatcher _fileWatcher;

        public Worker(ILogger<Worker> logger, IHttpClientFactory httpClientFactory)
        {
            _logger = logger;

            _httpClient = httpClientFactory.CreateClient();
            _httpClient.DefaultRequestHeaders.Add("User-Agent", "DCMonitorSvc");
            _httpClient.BaseAddress = new Uri(PushEndpoint);
        }

        protected override async Task ExecuteAsync(CancellationToken stoppingToken)
        {
            try
            {
                _logger.LogInformation("Worker running at: {time}", DateTimeOffset.Now);
                await Task.Delay(1000, stoppingToken);
            }
            catch (Exception ex)
            {
                _logger.LogError($"Worker error at {DateTime.Now}{Environment.NewLine}{ex.Message}");
            }
        }

        public override Task StartAsync(CancellationToken cancellationToken)
        {
            try
            {
                //System.Diagnostics.Debugger.Launch();

                _fileWatcher = SetupFileWatcher(TargetFile);
                return base.StartAsync(cancellationToken);
            }
            catch (Exception ex)
            {
                _logger.LogError($"Worker error at {DateTime.Now}{Environment.NewLine}{ex.Message}");
                return Task.FromResult(ex);
            }

        }

        public override Task StopAsync(CancellationToken cancellationToken)
        {
            _fileWatcher.EnableRaisingEvents = false;
            _fileWatcher.Dispose();
            return base.StopAsync(cancellationToken);
        }

        private FileSystemWatcher SetupFileWatcher(string targetFile)
        {
            var watcher = new FileSystemWatcher(targetFile, "*.txt");
            watcher.NotifyFilter = NotifyFilters.LastAccess
                                             | NotifyFilters.LastWrite
                                             | NotifyFilters.FileName
                                             | NotifyFilters.CreationTime
                                             | NotifyFilters.DirectoryName;

            // Add event handlers.
            watcher.Changed += OnChanged;

            // Begin watching.
            watcher.EnableRaisingEvents = true;
            return watcher;
        }

        private async void OnChanged(object source, FileSystemEventArgs e)
        {
            // Specify what is done when a file is changed, created, or deleted.
            Console.WriteLine($"File: {e.FullPath} {e.ChangeType} at {DateTime.Now}");

            if (e.ChangeType == WatcherChangeTypes.Changed)
            {
                try
                {
                    var fileContent = File.ReadAllText(e.FullPath);
                    var parts = fileContent.Split('|');

                    // 2020-08-08 16:59:00|AcA|aca-123|398120|112
                    if (!string.IsNullOrWhiteSpace(fileContent))
                    {
                        await Alert(fileContent);
                    }
                }
                catch (Exception ex)
                {
                    Console.WriteLine($"File is in use.{Environment.NewLine}{ex.Message}");
                }

            }
        }

        private async Task Alert(string notificationContent)
        {
            string url = $"alert?dc={notificationContent}&email={NotifyEmail}";
            var response = await _httpClient.GetAsync(url);
            response.EnsureSuccessStatusCode();
        }
    }
So what I have done here is:
Defining the StartAsync(), StopAsync() and Execute() functions as they map to start/stop the Windows Service we are developing. Most importantly, we create a FileWatcher which keeps tracking of the file(dc.txt) under the game folder and sends out notifications by calling an endpoint which I will cover in the next section.
Once the project is built, register this Windows Service in a command line like this:
上面这段代码中 我添加了 StartAsnc(), StopAsnyc() 因为他们对应着 启动/停止 Windows服务时 要做的事情。 更重要的是 创建了一个 FileWatcher, 通过它我们就能监控 dc.txt。
接下来我们要把这个 Windows服务注册到系统中。
# Register your Windows Service
> sc.exe create DCMonitor binPath="to-your-windows-service.exe"

# Delete your Windows Service
> sc.exe delete DCMonitor
Then press Win button and type Service to open the Services panel and start your very own Windows Service:
按下Win键 输入 Service 打开 Services面板,找到我们的WS 然后选择启动。

You can make it automatic so that it starts once PC starts.
Go to Task Manager, you should be able to find your Windows Service under background processes
你也可以让这个Windows 服务自动启动。启动后可以从 任务管理器 找到咱们新鲜出炉的 DC Monitor Windows Service! 😁

Section 2: Progressive Web App + Push Notification
In this section, I will provide references on how to set up a Gatsby.js + Netlify CMS website and add support to Service Worker so that we can turn the website into a Progressive Web App(PWA). Then I will set up Push Notification so that the PWA will be able to notify users when the delicious Diablo Clone events happens.
I use this gatsby-starter-netlify-cms template to start building my personal blog website. The reason is very simple, with a few steps of configuration, I am able to have a fully functional blog website. It also has the real-time preview functionality which enables me to see how my blog looks like when I am still in writing.
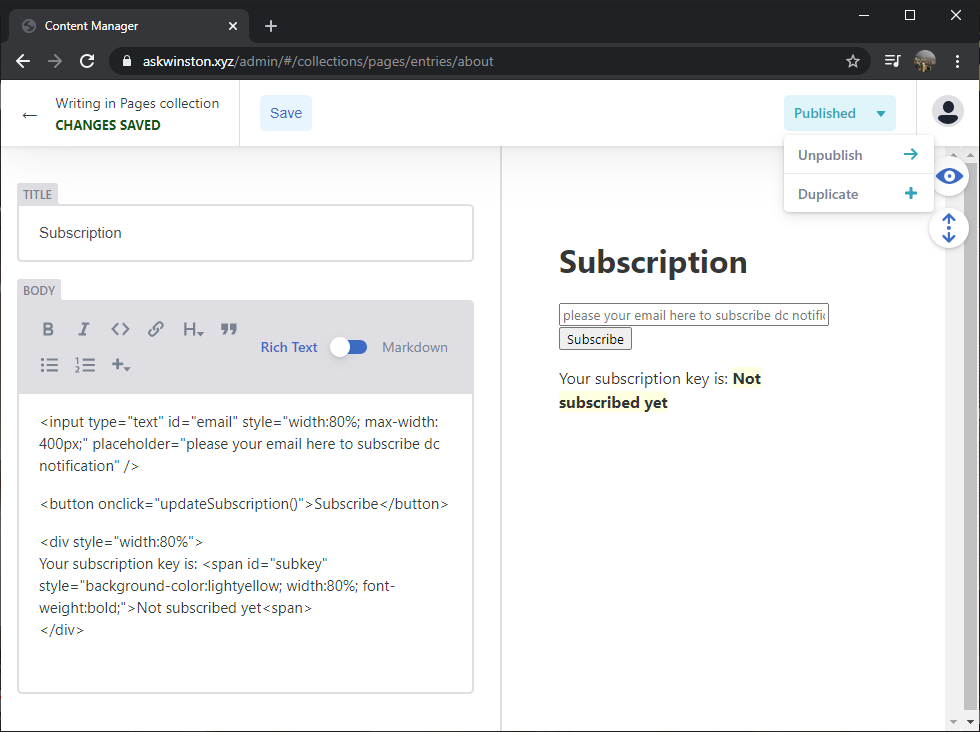
What is more interesting is, I can even use the Blog editor to add html components on a page on the fly! This means for simple UI changes, I do not even need any IDEs, simply just open my website's admin panel and write a few lines of code, then clicks Publish, the new html components will be immediately added onto my website. How cool it is~! 🤩
To give you a bit of idea about how it looks like:
Section 2: Progressive Web App(PWA) + 消息推送
在这一章节 我会提供如何设置好你的 Gatsby.js + Netlify CMS网站并且添加 Service Worker 如此你的网站就变成了 PWA.
PWA的好处很多,我就简单说一两个让我很动心的:
- 可以像App一样添加到桌面,但是体积会小很多
- 即使手机断网,网站上只要不涉及读取新数据的内同 都可以照常运行。
- 速度奇快~!😍
我使用的Gatsby模板是 gatsby-starter-netlify-cms。原因很简单, 轻松几步设置就能拥有自己的博客网站,而且还能有即时文章预览,让我能够 边写边看最终的成品是什么样子。
更有趣的是 如果我想在网页上添加新的 Html元素 例如一个 文本输入框, 我不用再打开专门的 软件开发IDE, 也不用再次部署 发布网站,我只要通过 Netlify CMS自带的 管理员编辑页面 就能添加新的Html元素,然后一键发布~!
这意味着更改一个网页就像 更新一篇文章一样简单~! 这太令人兴奋啦🤩
快速展示一下我在说些什么:
PWA
Adding Service Worker and convert our normal website to PWA has been made incredibly easy. Digital Ocean has written a great article which helps me a lot on converting my Gatsby website to PWA, I will not repeat what has been written there, so follow the tutorial here:
Making Gatsby a PWA: Service Worker and Web App Manifest.
One thing to notice here, in order for the web app manifest to be cached, we’ll need to list gatsby-plugin-manifestBEFORE gatsby-plugin-offline
Push Notification
Google has written its fantastic tutorials which I found particular useful and easy to follow:
Developing Progressive Web Apps 08.0: Integrating web push
Notes: on section 4, the old approach doesn't work anymore, so don't stop there, go ahead use the VAPID approach, everything will be fine 😉
When talking about push notification, there are 2 actions: Push and Notifying. Once I speak it out, it seems obvious, but back then I was not aware of these. So here is my learning notes:
The Push events happen at server side, the Notifying part happens at client side.
So let's do the client side part. In the project under the staticfolder add a file helpers.js:
PWA
现如今的技术 使得添加Service Worker并且把现有网站升级成PWA的步骤已经非常简化啦。有趣的是我在Digital Ocean(不是Gatsby.js官网)上找到的一篇文章帮助到了我。文章简练、易懂,因此我就不在这里赘述了:
Making Gatsby a PWA: Service Worker and Web App Manifest.
小笔记: 为了缓存web app manifest, 一定要把 gatsby-plugin-manifest放在gatsby-plugin-offline 之前,拿走不谢~😉
Push Notification 添加消息推送
Google在这方面写了一篇不错的文章,同样在此不再赘述,上菜~!
Developing Progressive Web Apps 08.0: Integrating web push
小笔记: 在Google教程中第四部分讲述了两种方法,第一种方法已经不管用,别苦恼,直接用第二种办法VAPID 😉
当谈起Push Notification的时候,它其实有2个部分: 推送 和 通知。 说出来了之后就觉得理所应当,但是很奇怪,当我自己做的时候 我竟然一直到读到这部分文档的时候才意识到Push Notification由2个不同的部分组成。
小笔记:消息推送发生在服务器端,消息通知则发生在客户端。🙄
Okay, 我们来看看客户端怎么写。 在刚创建好的 Gastby.js网站项目的 Static文件夹下面创建helpers.js
async function askForPermission() {
  console.log("ask for permission");
  if (!("Notification" in window)) {
    console.log("This browser does not support notifications!");
    throw new Error("This browser does not support notifications!");
  }

  const status = await Notification.requestPermission();
  console.log("Notification permission status:", status);
  return status === "granted";
}

function urlB64ToUint8Array() {
  const applicationServerPublicKey = "<your-precious-public-key>";

  const padding = "=".repeat((4 - (applicationServerPublicKey.length % 4)) % 4);
  const base64 = (applicationServerPublicKey + padding)
    .replace(/\-/g, "+")
    .replace(/_/g, "/");

  const rawData = window.atob(base64);
  const outputArray = new Uint8Array(rawData.length);

  for (let i = 0; i < rawData.length; ++i) {
    outputArray[i] = rawData.charCodeAt(i);
  }
  return outputArray;
}

// Subscribe user is actually subscribing push registration
async function subscribeUser(swRegistration) {
  const applicationServerKey = urlB64ToUint8Array();

  try {
    const subscription = await swRegistration.pushManager.subscribe({
      userVisibleOnly: true,
      applicationServerKey: applicationServerKey,
    });

    console.log("User has subscribed successfully");
    return subscription;

  } catch (subscribeError) {

    if (Notification.permission === "denied") {
      console.warn("Permission for notifications was denied");
    } else {
      console.error("Failed to subscribe the user: ", subscribeError);
    }

    return null;
  }
}

async function getSubscription() {
  try {
    const swRegistration = await navigator.serviceWorker.ready;
    let pushSubscription = await swRegistration.pushManager.getSubscription();

    // if not found from pushManager, then we subscribe the user right now
    if(!pushSubscription) {
      pushSubscription = await subscribeUser(swRegistration)
    }

    pushSubscription = pushSubscription.toJSON();
    document.getElementById("subkey").textContent = pushSubscription.keys.auth;
    return pushSubscription;
  } catch (error) {
    console.log("getSubscription() error: ", error);
    return null;
  }
}

function validateEmail(email) {
  const re = /^(([^<>()[\]\\.,;:\s@\"]+(\.[^<>()[\]\\.,;:\s@\"]+)*)|(\".+\"))@((\[[0-9]{1,3}\.[0-9]{1,3}\.[0-9]{1,3}\.[0-9]{1,3}\])|(([a-zA-Z\-0-9]+\.)+[a-zA-Z]{2,}))$/;
  const valid = re.test(email);
  return valid;
}

async function updateSubscriptionOnServer(pushSubscriptionObject) {
  let url = "";
  try {
    url = "https://yourwebsite.netlify.app/.netlify/functions/updateSubscription";

    await fetch(url, {
      method: "POST", // *GET, POST, PUT, DELETE, etc.
      mode: "no-cors", // no-cors, *cors, cors, same-origin
      cache: "no-cache", // *default, no-cache, reload, force-cache, only-if-cached
      credentials: "same-origin", // include, *same-origin, omit
      headers: {
        "Content-Type": "application/json;charset=utf-8",
      },
      redirect: "follow", // manual, *follow, error
      referrerPolicy: "no-referrer", // no-referrer, *no-referrer-when-downgrade, origin, origin-when-cross-origin, same-origin, strict-origin, strict-origin-when-cross-origin, unsafe-url
      body: JSON.stringify(pushSubscriptionObject), // body data type must match "Content-Type" header
    });

    return true;

  } catch (ex) {
    console.log("saveReg() catch block:", ex);
    return false;
  }
}

async function updateSubscription() {
  try {
    const allowed = await askForPermission();
    if (!allowed) return;

    let subscription = await getSubscription();
    if (!subscription) return;

    // email
    const email = getEmail();
    if (!email || !validateEmail(email)) {
      alert("huh...so how are you going to receive notifications?");
      return;
    }

    let extra = {
        email: email
    };

    subscription.extra = extra;
    const successful = await updateSubscriptionOnServer(subscription);

    if (successful) alert("you have successfully subscribed to the DC monitor");
    else alert("shit happens, try it later");
  } catch (err) {
    console.log("updateSubscription() failed: ", err);
  }
};

function getEmail() {
  console.log("getEmail()");
  let email = document.getElementById("email").value;

  const pathname = window.location.pathname;
  console.log("the current location is: ", pathname);
  if (pathname.indexOf("/about") >= 0) {
    email = document.getElementById("email").value;
  }

  if (localStorage) {
    if(!email) {
      email = localStorage.getItem("dc_email");
    } else {
      localStorage.setItem("dc_email", email);
    }
  }

  if (email) {
    document.getElementById("email").value = email;
  }

  console.log("getEmail(): ", email);
  return email;
};
So what we do here is:
- we need to ask user's permission to do push notification.
- get push subscription for this user from pushManager, if this user hasn't subscribed, then subscribe the user
- patch the email onto the push subscription object, so that later we can target specific users for different notifications.
- finally we save the updated push notification object into Fauna Database
In order to make the Javascript code available to the html components we added from the Blog editor, I have to put the script under static folder as all files under this folder will be kept as is. If I put the helpers.js under src folder, then the functions will be uglified then the function names will be simplified and I won't be able to reference them from the html code. Ideally, I would like to hide the public and private keys from the code and use Environment variables, but I have not figured it out. So please let me know if you are sure you know how to import the env variables for files under static folder. I have tried the dotenv, but had no luck.
Section 3: Netlify Functions
The features of Netlify Functions(NF) fits well as our server-less back-end. The idea is: our Windows Service calls the serverless functions and the functions will then notify the subscribed users.
Let's open lambda folder and add a file called: dcalert.js
上面这段代码 的功能是,一旦Netlify functions收到Http请求后,他会:
- 验证请求是否合格
- 从pushManager获得push subscription, 如果这个用户还没有订阅 那么就订阅一个 push subscription.
- 把从刚才那个About页面得到的Email地址加入到 push subscription里面。这样 之后就可以根据是否传入 email来判断是否把消息群发给 所有用户 还是某些特定用户. Firebase也有能单独发送push notifications的能力, 但是我会倾向于选择 省去不必要的 复杂度.
- 最终,把更新好的 push subscription 存入 Fauna Database.
为了配合在About 页面中加入的 html 控件,我必须把新添加的 helpers.js放入Static文件夹. 因为所有放入 static 文件夹的文件都不会在打包的时候被简化以至于 helpers.js的 函数名都被简化。理想状态下 我希望能把那些 public key用环境变量代替,就像我在其他文件里面做的那样,但是对于 这个特殊的static文件夹 这样做并不成功。 我也试过用 dotnet,也未成功。有知道的朋友可以给我支招。
Section 3: Netlify Functions
Netlify Functions(NF) 的server-less特性很符合作为我们的后端。
打开lamdba文件夹,并且添加 dcalert.js
const webPush = require("web-push");
const { getSubscriptions, removeSubscription, getResponse, getSubscriptionsByEmail } = require("./utils/utils.js");

const vapidPublicKey = process.env.VAPID_PUBLIC_KEY;
const vapidPrivateKey = process.env.VAPID_PRIVATE_KEY;
const notificationOptions = {
  TTL: 60,
  // TODO 4.3b - add VAPID details
  vapidDetails: {
    subject: `mailto:${process.env.VAPID_EMAIL}`,
    publicKey: vapidPublicKey,
    privateKey: vapidPrivateKey,
  },
};

async function notifySubscriber(pushSubscription, dc) {
  try {
    const response = await webPush.sendNotification(pushSubscription, dc, notificationOptions);
    if (response.statusCode % 200 <= 1) {
      console.log(`notification successfully sent at ${(new Date()).toString()}`, response);
      return true;
    }
    else {
      console.log(`notification sent at ${(new Date()).toString()} with status code ${response.statusCode}`, response);
      console.log("error: ", err);
      return  false;
    }
  }
  catch (ex) {

    if (ex.statusCode === 410) { // the subscription has expired or gone, then we remove the subscription from our database
      const auth = pushSubscription.keys.auth;
      const deleted = await removeSubscription(auth);
      if (deleted) {
        console.info(`subscription ${auth} has expired or gone, removed from database.`);
        return false;
      }
      else {
        console.error(`failed to remove expired subscription ${auth}`);
        return false;
      }
    }
    else {
      console.log("error: ", ex);
      return false;
    }
  }
}

function validateRequest(event) {
  const userAgent = event.headers["user-agent"];
  const dc = event.queryStringParameters.dc;

  if (!userAgent || !dc)
    return false;

  return true;
}

module.exports.handler = async function(event, context) {
  if (!validateRequest(event))
    return getResponse(400, "bad request");

  const userAgent = event.headers["user-agent"];
  const dc = event.queryStringParameters.dc;
  const email = event.queryStringParameters.email;

  if(!dc) {
    return getResponse(400, 'notification content cannot be empty');
  }

  let subscriptions = [];
  if (!email) {
    subscriptions = await getSubscriptions();
  } else {
    subscriptions = await getSubscriptionsByEmail(email);
  }

  if (!subscriptions) {
    return getResponse(200, 'No subscriber to notify');
  }

  let successfulCounter = 0;

  for (let pushSubscription of subscriptions) {
    const successful = await notifySubscriber(pushSubscription, dc);
    successfulCounter += successful ? 1 : 0;
  }

  if (successfulCounter === subscriptions.length) {
    return getResponse(200, `notification has been sent to all ${subscriptions.length} clients`);
  } else if (successfulCounter === 0) {
    return getResponse(500, `sending notification has failed`);
  } else {
    return getResponse(200, `notification has been sent to ${successfulCounter} out of ${subscriptions.length} clients`);
  }
};
What happens here is, once a Http request hits this api endpoint, it does
- validation against the request.
- get subscriptions according to whether we passed in an email or not, via setting the email, we will be able to control sending notifications to all our subscribers or just a particular user.
- iterate through the subscriptions and send out notifications.
One thing I'd like to point out is, push subscriptions could expire at some time, so we need to clean up those expired subscriptions. How do I handle this is when sending out notification, it will error out if the subscription has gone. I then use it as a chance to clean our the expired subscription. So take a look at catchsection of notifySubscriber().
tl;dr click to expand
Also I was thinking that in order to save time storing subscriptions into cache on the server with the lambda functions would be okay to me, then I was stuck at there for many hours.....puffy eyes, sleepless night....😫.
The reason why it doesn't work is each lambda function doesn't share cache, so a subscription created by endpoint saveSubscription() will not be accessible by another function.
In general we need to think of each run of a Netlify Function (or any AWS Lambda function) as being completely stateless. This includes the in-memory data of the running Node.js process. We can put things in memory and read them out of memory freely but only within the context of that single run. So thesaveSubscriptions()may work, but that memory will be erased quickly after that run is over.
Then how about saving them into a text file......not working.... Once again, puffy eyes, sleepless night.....😫
The reason is the file system on Lambda function server is read only.
This pushed me to the final solution: Fauna Database. It has free tier and recommended by Netlify, plus I always wanted to try this kind of NoSql like, non-structural database.
Look back what I have done so far, I have basically tried the JAM Stack with all these fantastic tools, it doesn't harm to add in one more fancy component into my project🤗🤗
Section 4: Fauna Database
Go to Fauna website and create an account, then log in it, you will see something like this:
以上代码干了3件事:
- 验证Http 请求
- 根据是否传入email 来从Fauna DB数据库里提取相应的push subscriptions
- 遍历提取出来的subscriptions 然后挨个发送
值得一提的一点是:push subscriptions 可能在某个时候过期,那么我们需要在某处把过期的subscriptions 清理掉。你可以看我在 notifySubscriber()的catch语句中是怎样做的。
td;dr 点击打开让你头晕但不重要的内容
我一开始想着,自己的小项目 用文本文件存储subscriptions就行,结果不管怎样都存储不了。一夜无眠...😫原来是因为 Netlify Function的文件系统由于安全原因 设置成了只读模式。
后来想着 那就用 cache 把。结果一个 Netlify Function 存储的cache 不能和另一个分享...😫 原来是每个Function都是stateless的 就连缓存都不公用。
这就迫使我找到了最后的解决方案: Fauna Database. 它有免费 服务,又有Netlify推荐,并且我一直都想尝试一下这种类似NoSql的数据库。 回看一下整个项目走到现在 我用的大部分技术栈都是我从来没用过的JAM Stack,也不差再来一个 花哨的NoSql数据库啦~🤗🤗
Section 4: Fauna Database
在 Fauna网站 上注册一个账号,登陆:
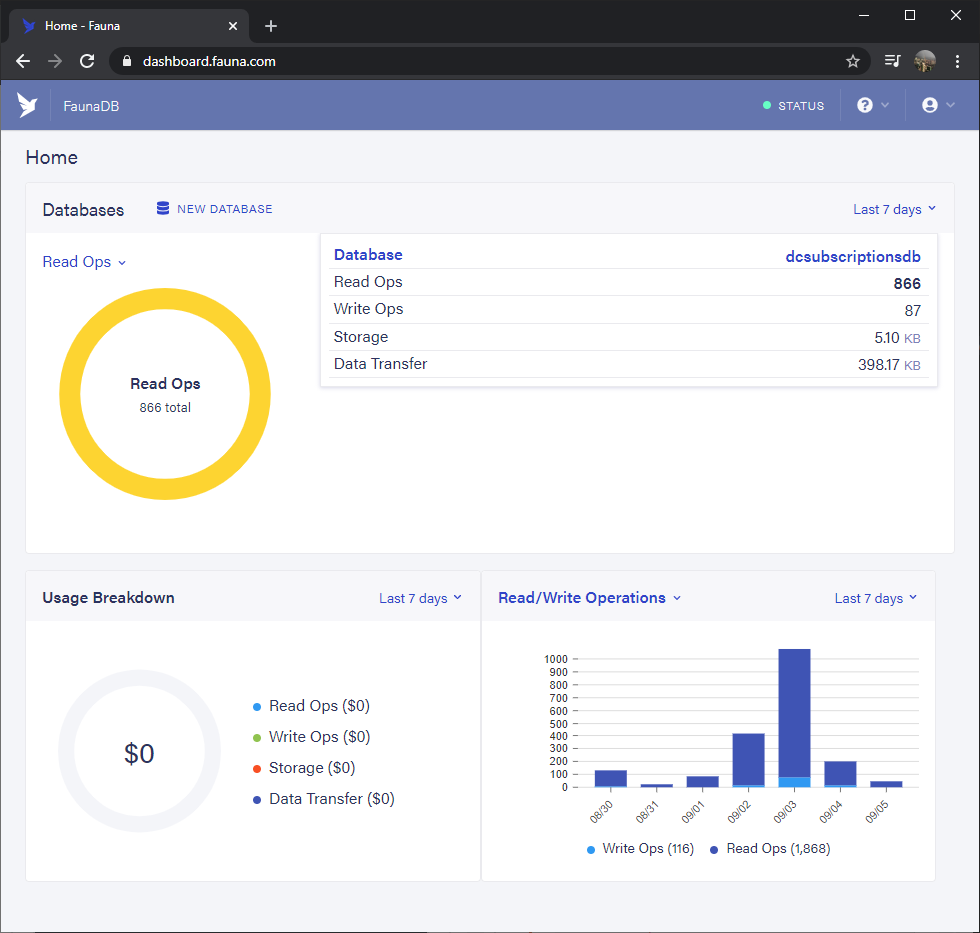
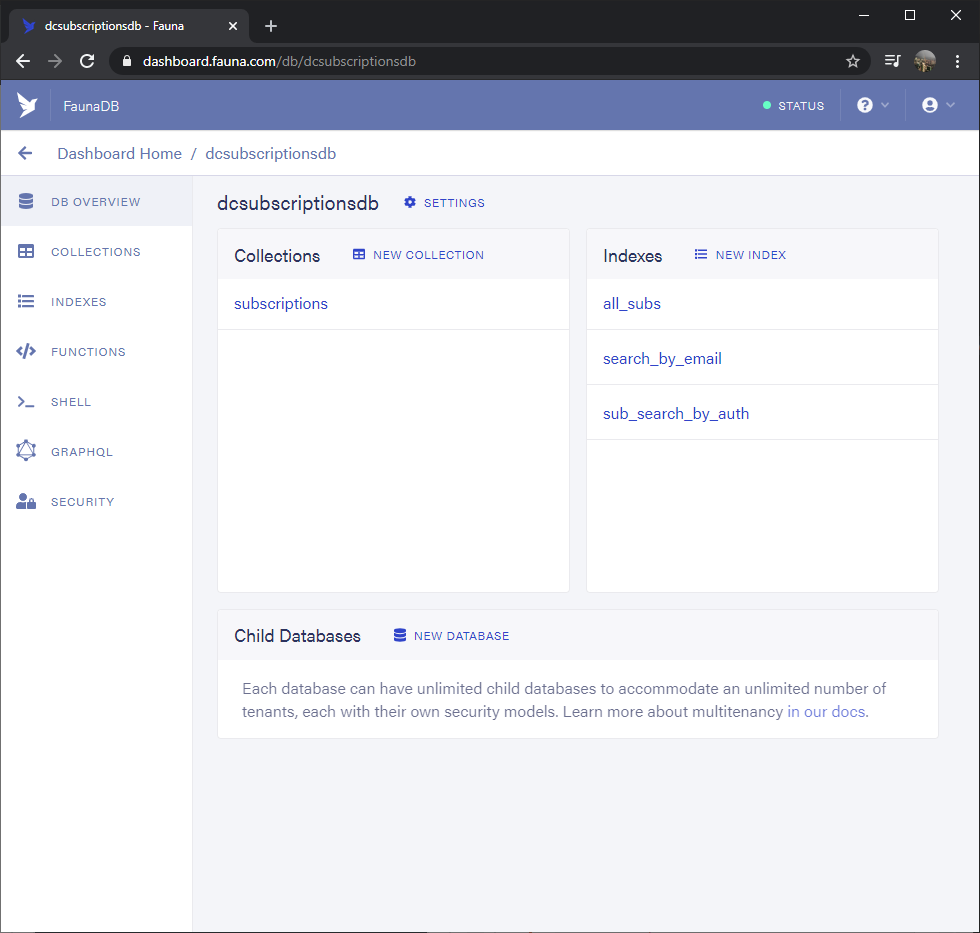
Shell is your friend to quickly try out queries and we can easily convert the FQL query to Javascript code.
This is how the shell looks like:
左手边的 Shell 是你的实验室,可以在这里快速写出 FQL query 然后验证代码是否正确后 转化成Javascript 代码. 这是它看起来的样子:

I have a utils.js file which does all the database CRUD operations. Found out how to do it in Javscript from the Netlify-Faunadb-example Github repository.
Create abootstrap.js script under scripts folder:
我创建了一个叫做 utils.js的文件 用来做 所有 增删改查的操作。具体怎样做可以在这个Netlify-Faunadb-example Github 上查看。
/* bootstrap database in your FaunaDB account */
const faunadb = require('faunadb')
const chalk = require('chalk')
const insideNetlify = insideNetlifyBuildContext()
const q = faunadb.query

console.log(chalk.cyan('Creating your FaunaDB Database...\n'))

// 1. Check for required enviroment variables
if (!process.env.FAUNADB_SERVER_SECRET) {
  console.log(chalk.yellow('Required FAUNADB_SERVER_SECRET enviroment variable not found.'))
  console.log(`Make sure you have created your Fauna databse with "netlify addons:create fauna"`)
  console.log(`Then run "npm run bootstrap" to setup your database schema`)
  if (insideNetlify) {
    process.exit(1)
  }
}

// Has var. Do the thing
if (process.env.FAUNADB_SERVER_SECRET) {
  createFaunaDB(process.env.FAUNADB_SERVER_SECRET).then(() => {
    console.log('Fauna Database schema has been created')
    console.log('Claim your fauna database with "netlify addons:auth fauna"')
  })
}

/* idempotent operation */
function createFaunaDB(key) {
  console.log('Create the fauna database schema!')
  const client = new faunadb.Client({
    secret: key
  })

  /* Based on your requirements, change the schema here */
  return client.query(q.Create(q.Ref('classes'), { name: '<your-lovely-database>' }))
    .then(() => {
      return client.query(
        q.Create(q.Ref('indexes'), {
          name: 'all_subs',
          source: q.Ref('classes/<your-lovely-database>')
        }))
    }).catch((e) => {
      // Database already exists
      if (e.requestResult.statusCode === 400 && e.message === 'instance not unique') {
        console.log('Fauna already setup! Good to go')
        console.log('Claim your fauna database with "netlify addons:auth fauna"')
        throw e
      }
    })
}

/* util methods */

// Test if inside netlify build context
function insideNetlifyBuildContext() {
  if (process.env.DEPLOY_PRIME_URL) {
    return true
  }
  return false
}
The above script creates the database for you, just replace the database name and also add FAUNADBSERVERSECRET into your .env file like this:
FAUNADB_SERVER_SECRET=your-precious-secret-key
Also you could set up your environment variables on Netlify directly:
以上的脚本会自动创建一个Fauna 数据库。别忘了 替换掉 FAUNADB_SERVER_SECRET ,把它写在 .env文件里,比如:
FAUNADB_SERVER_SECRET=your-precious-secret-key
你也可以直接在Netilify 上面直接设置这些参数:
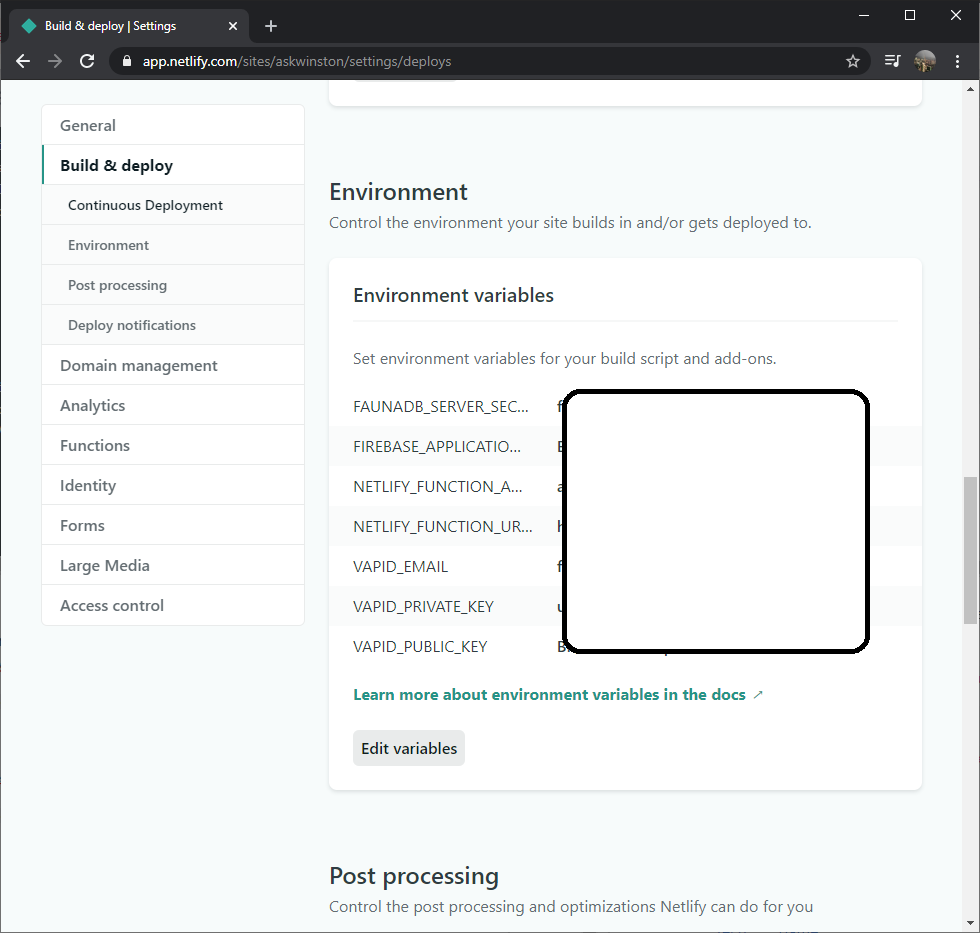
Then add a command script into package.json to run the bootstrap script:
"bootstrap":"netlify dev:exec node ./scripts/bootstrap-fauna-database.js"
then run
npm run bootstrap
Your Fauna Database is now ready to be consumed.
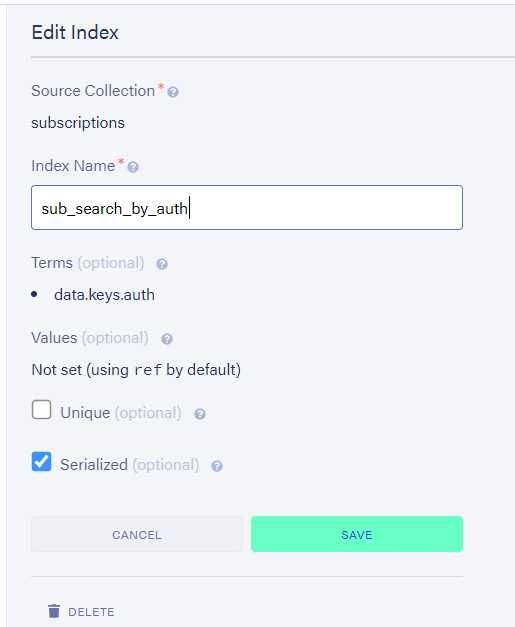
One thing needs to mention is: all searches with Fauna DB are done by indexes. So that means if I would like to search push subscriptions by email, then I need to create an index for it.
The indexes can be created via code or through Fauna DB's UI:
在 package.json里添加运行以上脚本的命令:
"bootstrap":"netlify dev:exec node ./scripts/bootstrap-fauna-database.js"
然后在命令行输入:
npm run bootstrap
刷新你的Fauna DB Overview页面 你将会看到创建好的数据库。
小笔记:FaunaDB中所有的搜索都要依靠 检索(index)。这意味着 如果你要 按照 email来搜索, 你就要为此创建一个index.
可以通过代码 创建Index, 也可以通过UI来创建 Index, 例如:
To give you an idea about how the FQL query looks like and how the converted Javascript code look like:
同时很有 必要 看一下 怎样转换 FQL代码到Javascript 代码:
# FQL Query
Map(
  Paginate(Match(Index("search_by_email"), "franva008@gmail.com")),
  Lambda("sub", Select(["data"], Get(Var("sub"))))
)

# Javascript code
const faunadb = require("faunadb");
const q = faunadb.query;

const client = new faunadb.Client({
  secret: process.env.FAUNADB_SERVER_SECRET,
});
 const response = await client.query(
        q.Map(
          q.Paginate(
            q.Match(q.Index("search_by_email"), param)
          ),
          q.Lambda(
            "sub",
            q.Select(["data"], q.Get(q.Var("sub")))
          )
        )
      );
Now you should have a rough idea about how the whole project works and how these components work together to achieve the instant push notification.
Looking back at the very beginning of this project, the whole idea started as a small push notification for Diablo Clone, I had never thought that this project could expand to across so many technical stacks and took me so many sleepless nights and efforts to complete.
Finally, I hope you enjoy this article and make your very own PWA with Push notification enabled 🤩.
说到这里,整个 项目的知识点算是介绍完毕,关于所有组件是怎样一起协调工作的 你也应该有一个大概的理解了。
再次回顾一下项目刚开始的时候,我以为就是在手机上显示 Diablo的 游戏信息会非常简单,却从没想过 一个小小的项目居然会变成这么大 牵扯到这么多不同的部分,花了我这么多时间和精力去学习去编码。但我也从中学到了太多,激动一下~!😋
最后,希望你们能从这里找到一些有用的知识,然后做出专属于你们自己的PWA和消息推送系统😏。